How KwikAds helped Shop Unrush boost ROAS by 37% in 3 months
How KwikAds helped Shop Unrush boost ROAS by 37% in 3 months
How KwikAds helped Shop Unrush boost ROAS by 37% in 3 months
How KwikAds helped Shop Unrush boost ROAS by 37% in 3 months
Shopify
What Is the General Checklist for Starting a New Shopify Store?
 08 Jun 2026
 09 Min Read
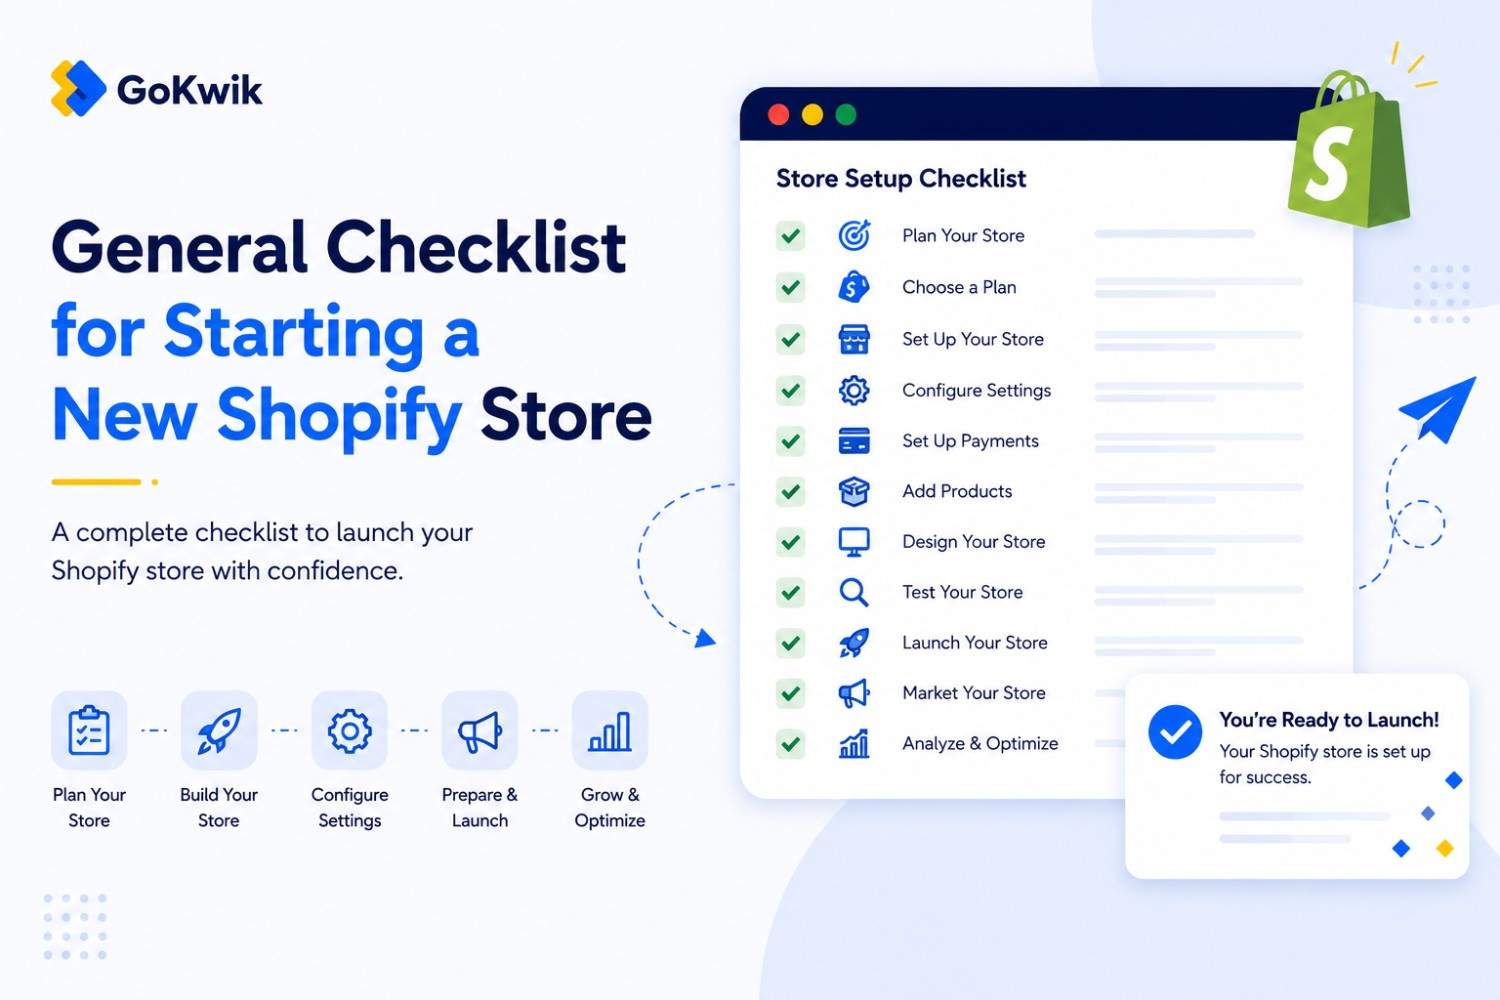
Suhag spearheads D2C growth strategies at GoKwik, focusing on e-commerce optimisation, conversion funnels, and sales enablement. Based in Bengaluru and an MICA alumnus, he excels in crafting GTM playbooks and marketing campaigns tailored for D2C brands.
Read this blog on your favourite platform
Setting up a Shopify store without a clear roadmap leads to missed configurations, launch delays, and avoidable mistakes. New merchants often skip critical steps like email authentication or tax setup, then scramble to fix issues after launch.
This checklist covers the complete setup sequence for launching a production-ready Shopify store-from initial business decisions through launch preparation. It's organized by setup phase, with decision points flagged where your choices affect features, costs, or operational efficiency.
Before You Start: Pre-Setup Decisions
Before you create your Shopify account, answer these foundational questions. Your answers determine which features you need, which plan makes sense, and how you structure your store from day one.
Business and Legal Foundation
Register your business with local authorities before starting with Shopify. Open a separate business bank account to keep personal and business finances separate. This simplifies accounting and tax filing later.
Find local experts to advise on taxes and legal requirements for your business type and location. Tax compliance is your responsibility-Shopify calculates taxes but doesn't file or remit on your behalf unless you use Shopify Tax automated filing.
Sales Channel Selection
Choose which sales channels you want to use before building your catalog. Your options include your online store, social media channels like Instagram and Facebook, marketplaces, and Shopify POS for in-person sales. Sales channel eligibility depends on your region, product types, and sometimes your subscription plan.
If you're interested in selling in person, learn about Shopify POS and available hardware. POS hardware availability and Tap to Pay support vary by country.
Migration Considerations
If you already have an ecommerce website, consider migrating it to Shopify. You can migrate product data, customer records, and order history from another platform. Set up URL redirects to preserve your search engine rankings when moving from another platform.
Plan Selection Strategy
Think about which pricing plan you need, but you don't need to choose a plan until the end of your free trial. Your Shopify subscription pricing plan affects the features available to you, including the number of staff accounts, transaction fees, reporting capabilities, and sales channel eligibility.
The Basic plan allows no additional staff accounts, the Grow plan allows 5, the Advanced plan allows 15, and Shopify Plus allows unlimited staff. Credit card processing fees decrease on higher-tier plans, so upgrade when your sales volume makes the savings cover the higher monthly cost.
First Steps: Store Foundation Setup
Once you've started your free trial, complete these configuration tasks before adding products. These settings establish how your store operates and how customers interact with your business.
Store Information and Settings
From your Shopify admin, go to Settings. Enter your store information including business name, address, contact details, and store owner email. This information appears on invoices, packing slips, and legal pages.
Domain Configuration
Set up your domain to make sure customers can find your store online. You can buy a domain from Shopify or connect an existing domain you already own. Your myshopify.com domain name can only be changed a single time, so choose carefully during initial setup.
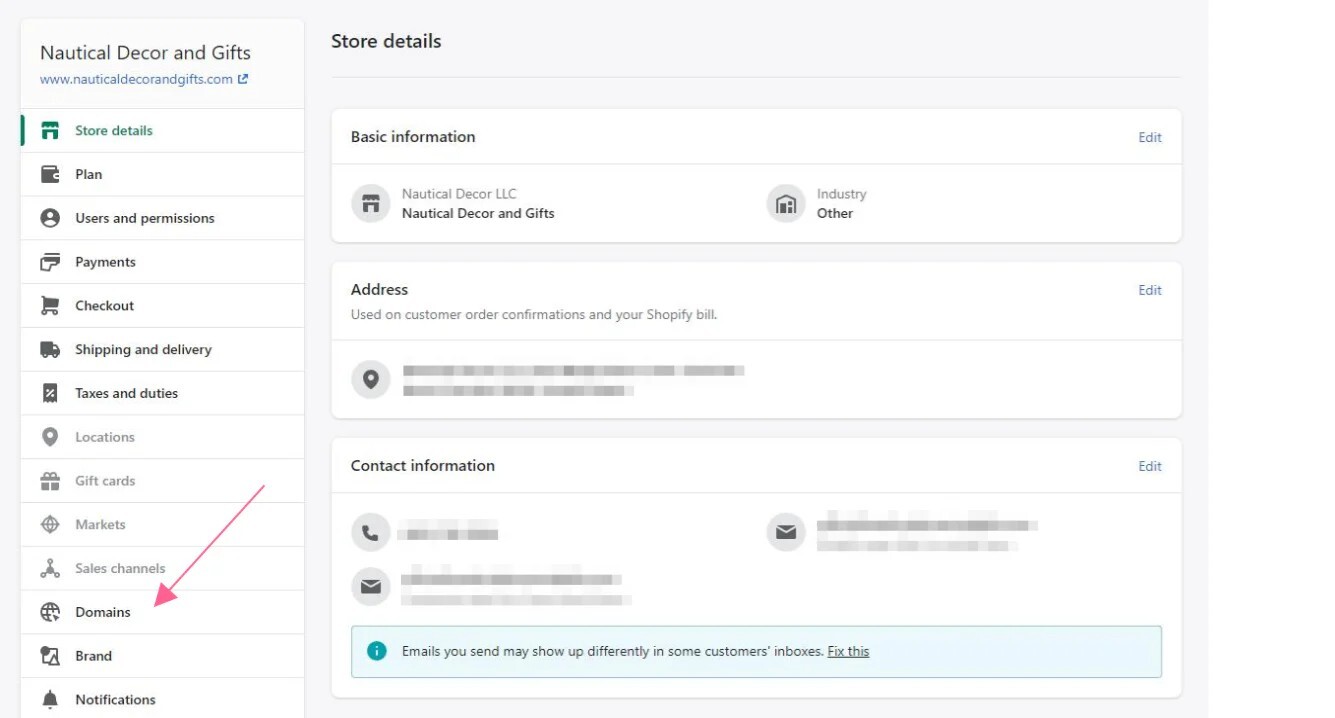
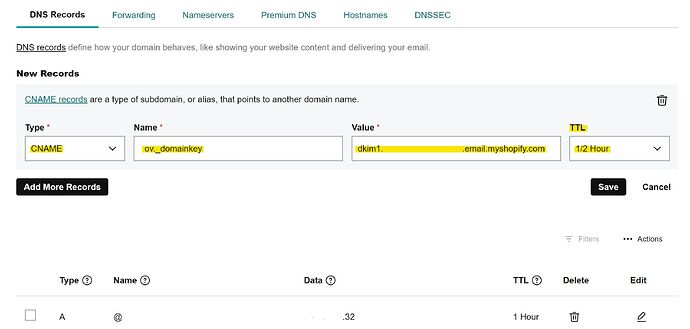
Email Authentication Setup
Set up email sender authentication (SPF and DKIM records) immediately. This is required by major email providers such as Gmail and Yahoo. Without proper authentication, your store emails might be sent to spam or junk folders, which directly impacts order confirmations, shipping notifications, and abandoned cart recovery.
Tax Configuration
Review your tax settings and contact a tax expert if needed. Many merchants need to charge taxes on their sales and then report and remit those taxes to their government. Shopify calculates taxes based on your settings but doesn't file or remit on your behalf unless you use Shopify Tax.
Payment Provider Setup
Configure your payment provider. If you're using Shopify Payments, the setup happens directly in your admin. If you're using a third-party payment provider, note that transaction fees apply on top of your subscription plan fees.
Staff Accounts
Add staff accounts if you have team members who need access. The number of staff accounts depends on your plan. Set appropriate permissions for each team member based on their role-not everyone needs full admin access.
Store Policies
Create store policies using Shopify's templates or write custom policies. Store policy templates are available in English and Spanish. Common required policies include refund policy, privacy policy, terms of service, and shipping policy. These policies display in your checkout and build customer trust.
Product and Store Content Setup
With foundational settings complete, build your product catalog and customer-facing content.
Add Your First Product
From your Shopify admin, go to Products. Click Add product. Enter a title for your product along with description, pricing, inventory, shipping details, and images. Click Save.
Work with your client to develop high quality images for their products. Review Shopify's tips for creating and uploading images. You can add multiple products at one time by importing them using a CSV file if you have a large catalog.
Theme Selection and Customization
Choose a theme for your online store. From your Shopify admin, go to Online Store > Themes. Your store comes with a default theme, but you can add different themes.
To add a free theme, scroll to the Free themes section and click Explore free themes. Browse available themes, preview theme styles, and click Add for the theme you want. Free themes are developed by Shopify and supported by Shopify.
You can also buy paid themes from the Shopify Theme Store. Paid themes are developed by third-party designers, and help with customizations is provided by the theme designer. You can try a paid theme before buying.
Customize your chosen theme to match your brand. Add your logo, adjust colors and typography, configure layout settings, and preview changes before publishing.
Essential Pages
Create pages that describe your store and build customer confidence. Common page types include About Us, contact information, FAQs, refund policy, shipping information, and privacy policy. From your admin, go to Online Store > Pages, then click Add page.
Collection Organization
Create product collections to organize your catalog and make browsing easier for customers. Collections can be manual (you select products individually) or automated (products are added based on rules like product type, price, or tags).
App Integration
Add apps from the Shopify App Store to extend your store's functionality. Common app categories include email marketing, product reviews, inventory management, shipping automation, and customer support tools. Only install apps you actually need-too many apps can slow your store and complicate management.
Pre-Launch Testing
Before launching, test your complete customer experience. Place test orders using different payment methods, verify email notifications are sending correctly, test checkout on mobile devices, confirm shipping rates calculate accurately, and review all policies and legal pages.
Use Shopify's preview functionality to see your store as customers will see it before removing password protection.
Launch Preparation
When you're ready to launch, complete these final steps:
Remove password protection from your online store in Online Store > Preferences. Select a paid plan-your trial ends and you need an active subscription to keep your store live. Verify your domain is connected and working properly. Announce your launch through your marketing channels.
If you're on Shopify Plus, use the Shopify Plus plan launch checklist for additional enterprise considerations.
Post-Launch Optimization
After launch, focus on growing your business. Set up analytics and tracking to monitor performance. Configure abandoned cart recovery to recapture lost sales. Build your email marketing list and set up automated email flows. Monitor your conversion funnel and identify drop-off points. Test and optimize your product pages and checkout experience.
Consider working with Shopify Partners for specialized help with development, design, or marketing. The Shopify Partner Directory connects you with vetted experts who can help grow your business.
💡Tip from Reddit Conversations:
What merchants on Reddit actually say about this:
"Don't overthink the theme choice in the beginning. Pick one of the free themes, get your products up, and launch. You can always switch themes later without losing your products or settings. I wasted two weeks theme shopping when I should have been selling."
FAQ

AUTHOR
Suhag Vamja
Head of Product Marketing @ GoKwik