|
Method |
Best for |
What you need |
|
Add products directly in Shopify admin |
Small menus (under 50 items) |
Product names, descriptions, prices, images |
|
Import via CSV file |
Large menus (50+ items) |
Spreadsheet with product details formatted correctly |
|
Import from third-party POS |
Existing POS users |
Products already in another system like Square or Toast |
How KwikAds helped Shop Unrush boost ROAS by 37% in 3 months
How KwikAds helped Shop Unrush boost ROAS by 37% in 3 months
How KwikAds helped Shop Unrush boost ROAS by 37% in 3 months
How KwikAds helped Shop Unrush boost ROAS by 37% in 3 months
Shopify
How to Move a Restaurant Online Using Shopify
 08 Jun 2026
 09 Min Read
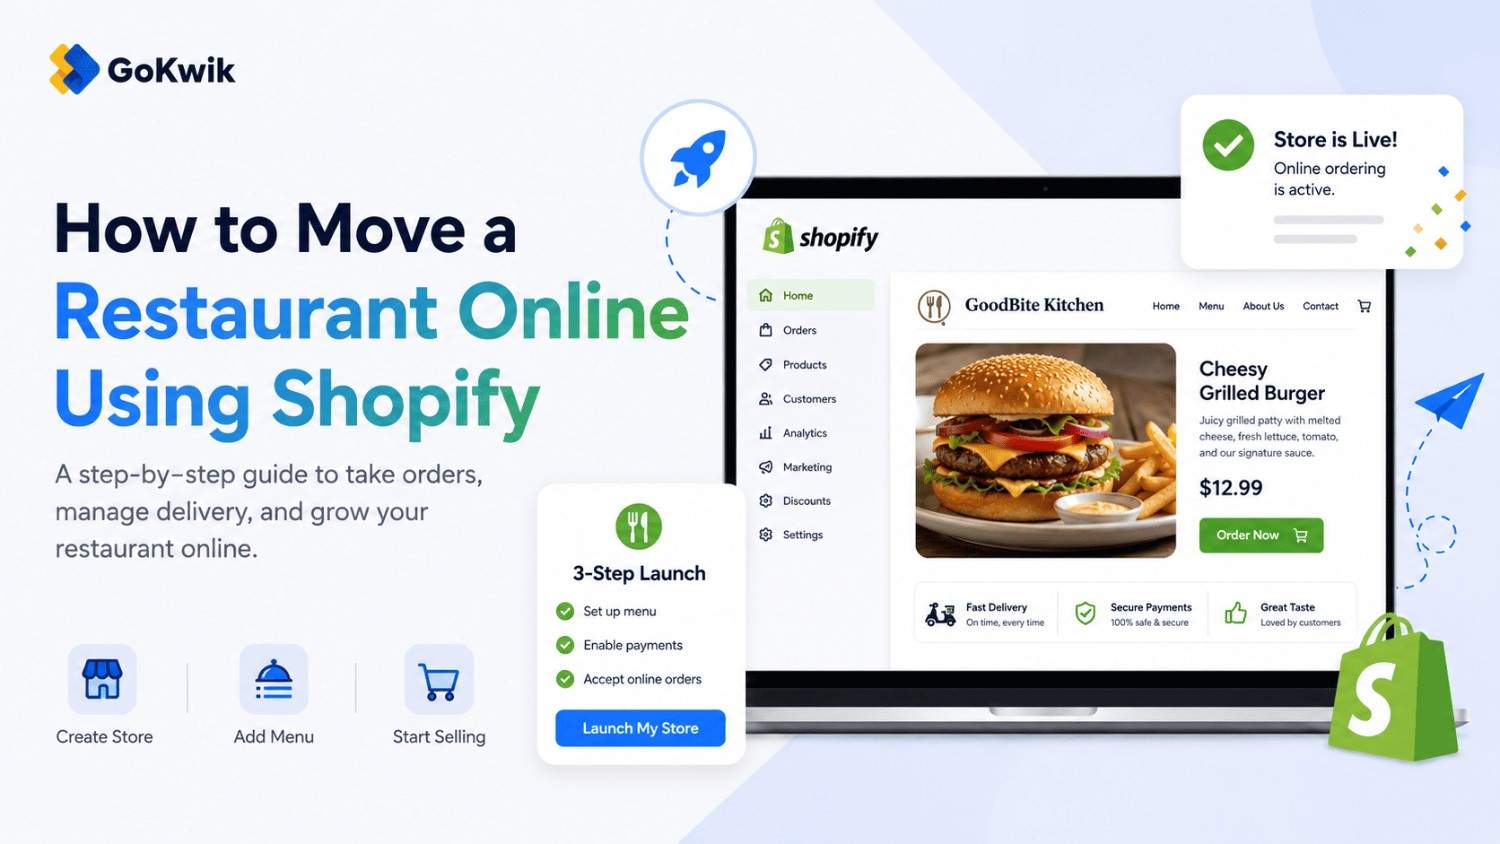
Vardhan leads product and growth initiatives at GoKwik, driving D2C e-commerce innovations, conversion optimization, and scalable growth programs for products. An ISB alumnus based in Bengaluru, he brings expertise from Unacademy, Ola, and Mahindra in building high-impact product strategies.
Read this blog on your favourite platform
If you run a restaurant and want to offer online ordering, delivery, or pickup alongside dine-in service, Shopify gives you a complete platform to sell meals, manage menus, and reach customers beyond your physical location. This guide walks you through the setup process, from launching your store to building your menu and choosing a theme that reflects your brand.
Why Move Your Restaurant Online
Selling online lets you offer customers pickup, delivery, or gift card purchases in addition to traditional dine-in options. An online presence also gives you a place to share your story, collect reviews, display your full menu with descriptions and pricing, and capture email signups for future marketing.
Step 1: Start Your Online Store
Visit shopify.com and start your online store with a free trial. You'll need to provide your email, create a password, and enter your business name. Your business name becomes part of your store's default URL, which customers will use to access your online menu and place orders.

After starting your trial, you can purchase or connect an existing domain to replace your default URL with a custom one that matches your restaurant's brand.
Adding Products Directly
If you're adding products one by one through the Shopify admin, go to Products > Add a new product. For each menu item, include the dish name, a detailed description that mentions key ingredients or preparation style, the price, and at least one high-quality photo.
Importing Products in Bulk
If you have a large menu, use a CSV file to import all items at once. This method requires formatting your product data in a specific spreadsheet structure that Shopify can read.
Importing from Third-Party POS
If your menu already exists in third-party POS software, you can import those products into Shopify using the all-new Shopify POS integration.
Step 4: Set Up Gift Cards
Gift cards offer a fast way to generate online revenue before you've fully launched delivery or pickup. Customers purchase gift cards that are delivered by email. By default, gift cards you create never expire, and customers can redeem them at checkout when ordering meals for pickup or delivery.
To activate gift cards, enable them in your Shopify admin under Products. Gift cards work immediately and require no additional setup beyond turning on the feature.
Note: new gift card products are hidden by default - you must publish the product to make it visible and purchasable in your store. Once published, customers who buy a gift card will receive a unique code by email, which they can apply at checkout.
Step 5: Choose a Restaurant Theme
Your online store needs a theme that reflects your restaurant's brand and makes it easy for customers to browse and order. If you select "Restaurants" as your industry when creating your store, Shopify automatically adds the Crave theme.
Crave is a free theme designed specifically for restaurants. It includes mobile-optimized layouts and accelerated checkout options that work smoothly on smartphones and tablets, which is critical since many customers order food from their phones. The theme also includes visual storytelling sections and blocks that let you showcase your brand story, chef profiles, or signature dishes.
You can preview how Crave looks with your menu and branding before publishing your site.
Step 6: Set Up Your Homepage and Custom Pages
Each product and collection automatically gets its own page, but you need to manually set up your homepage and additional pages customers expect to find.
Homepage Setup
Your homepage is typically the first page customers see when they visit your site. Include your restaurant's branding, featured or popular dishes, current specials or promotions, and any important information like hours of operation or health and safety protocols.
Essential Custom Pages
Most restaurants benefit from creating these custom pages:
- About Us: Share your restaurant's story, chef background, or sourcing philosophy
- Contact Us: Include your phone number, email, physical address, and a contact form
- FAQ: Answer common questions about ordering, delivery times, dietary accommodations, and refund policies
Step 7: Set Up Payment Methods
The simplest way to accept online payments is through Shopify Payments, which integrates directly with your store and lets you manage orders and financials in one place without setting up a separate merchant account.
To activate Shopify Payments, go to Settings > Payments in your Shopify admin. If you haven't set up any payment provider yet, click "Complete account setup" in the Shopify Payments section. Enter your business details and banking information, then click Save and Complete account setup.
If you already have a different payment provider active, you'll need to deactivate it first before enabling Shopify Payments.
Also, Shopify allows customers to add a tip during checkout - a useful feature for restaurants. To enable it, go to Settings > Checkout and scroll to the Tipping section. Select Show tipping at checkout and configure up to three preset percentage options (for example, 10%, 15%, 20%). Customers can also enter a custom tip amount. Tips are calculated on the cart subtotal before taxes and shipping.
Step 8: Configure Locations for Fulfillment
If you're offering pickup or delivery from multiple restaurant locations, you need to set up each location in Shopify. This ensures accurate inventory tracking and helps you route orders to the right kitchen.
Go to Settings > Locations and click Add location. Enter the location name and full address. If you want inventory at this location available for online orders, keep the "Inventory at this location is available to fulfill online orders" option activated.
If you have multiple active locations, specify the priority sequence for order fulfillments to ensure orders go to the right place first.
If you plan to offer local delivery or curbside pickup, go to Settings > Shipping and delivery. In the Local pickup section, click Set up, select your location, and activate.
Step 9: Test Your Store Before Launch
Before sharing your online store with customers, place test orders to confirm everything works correctly. Test the full customer experience: browse your menu, add items to cart, proceed through checkout, and complete payment using Shopify's test mode.
Check that confirmation emails arrive correctly, order details appear properly in your admin, and you can mark orders as fulfilled.
Step 10: Set Up Your Domain
Your default Shopify URL works for testing, but before launch you should purchase or connect a custom domain that matches your restaurant name. This makes your store look professional and easier for customers to remember.
Go to Settings > Domains to purchase a new domain through Shopify or connect one you already own.
Common Mistakes to Avoid
Poor product photography: Blurry or poorly lit food photos significantly reduce online orders. Invest in quality photos or hire a food photographer.
Missing descriptions: Don't assume customers know what a dish contains. List main ingredients and preparation methods.
No mobile testing: Most restaurant orders come from mobile devices. Test your entire ordering flow on a smartphone before launch.
Complicated checkout: The fewer steps between browsing and completing payment, the higher your conversion rate. Remove any optional fields from checkout.
Ignoring local delivery logistics: If offering delivery, clearly communicate delivery zones, minimum order amounts, and estimated delivery times on your homepage and FAQ.
💡 Tip from Shopify Community
"Set up your delivery zones in Zapiet carefully before launch. Customers on local pickup can still type in a far-away delivery address at checkout, which causes real confusion. Lock down your radius settings early so orders don't come in from outside your actual service area."
FAQ
Next Steps
Your restaurant is now ready to accept online orders. Test your complete customer journey one final time, then share your store URL with existing customers through email, social media, and in-store signage.

AUTHOR
Vardhan Jain
Director of Product Program @ GoKwik